Enabling the power of NVIDIA GPUs on Ubuntu 20.04 can significantly enhance your computational capabilities, especially for tasks like deep learning, data science, and high-performance computing. This guide will walk you through the installation and configuration of NVIDIA GPU drivers and CUDA on Ubuntu 20.04. This comprehensive tutorial is tailored for digital nomads, programmers, and data scientists who need robust GPU performance on the go.
Table of Contents
Introduction
Why Use GPU with CUDA?
Graphics Processing Units (GPUs) are powerful tools for parallel processing, making them ideal for machine learning, data processing, and scientific computations. CUDA (Compute Unified Device Architecture) is NVIDIA's parallel computing platform and programming model, allowing developers to leverage the power of NVIDIA GPUs.
Audience and Goals
This guide is for digital nomads, programmers, and data scientists who want to install and configure NVIDIA GPU drivers and CUDA on their Ubuntu 20.04 systems. We will cover the necessary steps and explain how to ensure your setup is working correctly.
Prerequisites
Before we start, make sure you have the following:
- A system running Ubuntu 20.04
- An NVIDIA GPU (NVIDIA GeForce RTX 4060)
- Basic knowledge of using the terminal
- Administrative privileges
Step-by-Step Installation and Configuration
Update Your System
First, update your system to ensure all packages are up to date:
|
1 2 |
sudo apt update sudo apt upgrade -y |
Install NVIDIA Drivers and CUDA toolkit
To install the latest NVIDIA drivers, add the repositories from NVIDIA:
|
1 |
nvidia-detector |
This command will return the version of NVIDIA_DRIVER we need
|
1 2 3 4 |
NVARCH=$(arch) curl -fsSL https://developer.download.nvidia.com/compute/cuda/repos/ubuntu2004/${NVARCH}/3bf863cc.pub | sudo apt-key add - echo "deb https://developer.download.nvidia.com/compute/cuda/repos/ubuntu2004/${NVARCH} /" | sudo tee /etc/apt/sources.list.d/cuda.list |
Install the driver. In my case NVIDIA_DRIVER=535:
|
1 2 3 4 5 6 |
NVIDIA_DRIVER=535 sudo apt update -y sudo apt-get install -y nvidia-driver-$NVIDIA_DRIVER sudo apt-get install -y nvidia-cuda-toolkit \ && sudo apt-get install -y nvidia-cuda-dev |
Reboot your system:
|
1 |
sudo reboot |
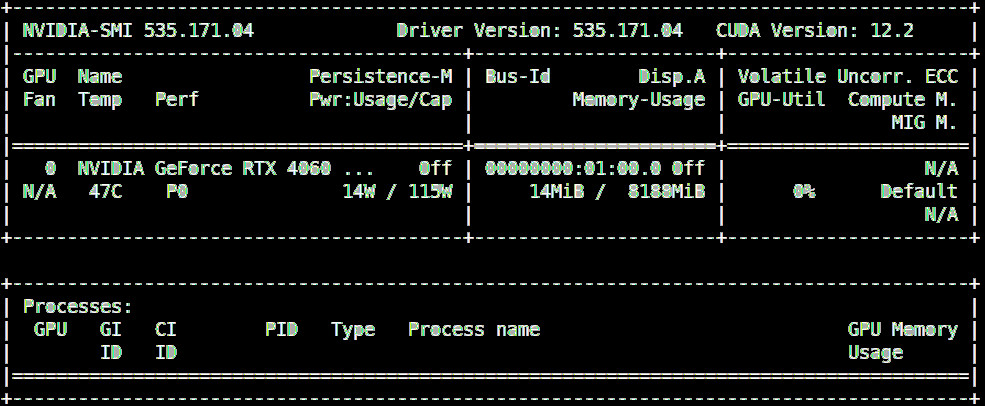
After rebooting, verify the installation by checking if the NVIDIA drivers are installed correctly:
|
1 |
nvidia-smi |
This command should display the details of your NVIDIA GPU.
|
1 2 3 4 5 6 7 8 9 10 11 12 13 14 15 16 17 18 19 20 21 |
+---------------------------------------------------------------------------------------+ | NVIDIA-SMI 535.171.04 Driver Version: 535.171.04 CUDA Version: 12.2 | |-----------------------------------------+----------------------+----------------------+ | GPU Name Persistence-M | Bus-Id Disp.A | Volatile Uncorr. ECC | | Fan Temp Perf Pwr:Usage/Cap | Memory-Usage | GPU-Util Compute M. | | | | MIG M. | |=========================================+======================+======================| | 0 NVIDIA GeForce RTX 4060 ... Off | 00000000:01:00.0 Off | N/A | | N/A 46C P0 N/A / 115W | 14MiB / 8188MiB | 0% Default | | | | N/A | +-----------------------------------------+----------------------+----------------------+ +---------------------------------------------------------------------------------------+ | Processes: | | GPU GI CI PID Type Process name GPU Memory | | ID ID Usage | |=======================================================================================| | 0 N/A N/A 1377 G /usr/lib/xorg/Xorg 4MiB | | 0 N/A N/A 2715 G /usr/lib/xorg/Xorg 4MiB | +---------------------------------------------------------------------------------------+ |
To install the CUDA toolkit, start by downloading it from the official NVIDIA site. Choose the version compatible with your system.
Set up environment variables by adding the following lines to your ~/.bashrc file:
|
1 2 |
export PATH=/usr/local/cuda-12/bin${PATH:+:${PATH}} export LD_LIBRARY_PATH=/usr/local/cuda-12/lib64${LD_LIBRARY_PATH:+:${LD_LIBRARY_PATH}} |
Replace CUDA-12 with the version of CUDA you installed.
Source the .bashrc file:
|
1 |
source ~/.bashrc |
Verify the installation to ensure CUDA is installed correctly:
|
1 |
nvcc --version |
This command should display the version of CUDA installed.
Install Docker and NVIDIA Container Toolkit
Docker is a powerful tool for creating, deploying, and managing containerized applications. The NVIDIA Container Toolkit allows you to run GPU-accelerated containers. To install Docker and the NVIDIA Container Toolkit, follow these steps:
Install Docker
To install Docker, follow these steps:
Update your package list:
|
1 |
sudo apt update |
Install Docker:
|
1 |
sudo apt install -y docker |
Start and enable Docker service:
|
1 2 |
sudo systemctl start docker sudo systemctl enable docker |
Add your user to the Docker group to run Docker commands without sudo:
|
1 |
sudo usermod -aG docker $USER |
Log out and log back in for the group changes to take effect.
Verify the Docker installation:
|
1 |
docker --version |
Install NVIDIA Container Toolkit
To install the NVIDIA Container Toolkit, follow these steps:
Set up the repository and key:
|
1 2 3 |
distribution=$(. /etc/os-release;echo $ID$VERSION_ID) curl -s -L https://nvidia.github.io/nvidia-docker/gpgkey | sudo apt-key add - curl -s -L https://nvidia.github.io/nvidia-docker/$distribution/nvidia-docker.list | sudo tee /etc/apt/sources.list.d/nvidia-docker.list |
Update the package list:
|
1 |
sudo apt update |
Install the NVIDIA Container Toolkit:
|
1 |
sudo apt install -y nvidia-docker2 |
Restart the Docker service:
|
1 |
sudo systemctl restart docker |
Verify the installation by running a test container:
|
1 |
docker run --rm --gpus all nvidia/cuda:11.0.3-base-ubuntu20.04 nvidia-smi |
This command should display the details of your NVIDIA GPU from within the container.

Practical Applications
Machine Learning and Deep Learning
Utilizing NVIDIA GPUs with CUDA can significantly speed up machine learning and deep learning tasks. Libraries like TensorFlow and PyTorch can leverage CUDA to perform computations on the GPU, reducing training time for models.
Scientific Computing
CUDA can be used for high-performance scientific computing. Tasks that require massive parallel computations, such as simulations and numerical methods, can benefit greatly from GPU acceleration.
Data Processing
Working with large datasets can be accelerated using GPUs. Tools like RAPIDS leverage CUDA to provide fast, GPU-accelerated data processing pipelines.
Troubleshooting
Common Issues and Solutions
Driver Installation Issues
If nvidia-smi does not recognize the GPU, you may need to reinstall the NVIDIA driver. If the machine does not boot properly, then use "different kernel" from the Grub boot menu.
|
1 2 |
sudo apt-get purge nvidia* sudo apt-get autoremove |
CUDA Toolkit Issues
If nvcc --version does not display the correct version, verify that the PATH and LD_LIBRARY_PATH environment variables are set correctly in your ~/.bashrc file. Source the file again:
|
1 |
source ~/.bashrc |
Docker and NVIDIA Container Toolkit Issues
If the NVIDIA Docker runtime is not working, ensure that the NVIDIA Container Toolkit is installed correctly and the Docker service is restarted. Check for errors in the Docker logs:
|
1 |
sudo systemctl status docker |
Performance Optimization
Optimize Memory Usage
Ensure your code efficiently manages GPU memory. Allocate and deallocate memory as needed, and minimize memory transfers between the CPU and GPU.
Utilize Libraries
Use optimized libraries such as cuBLAS and cuFFT for common tasks like linear algebra and fast Fourier transforms.
Conclusion
Setting up NVIDIA GPU drivers (v535) and CUDA 12 on Ubuntu 20.04 is a valuable skill for digital nomads, programmers, and data scientists. This guide has provided a step-by-step process for installation and configuration, along with troubleshooting tips. By leveraging the power of GPUs and CUDA, you can significantly enhance your computational capabilities, whether you're working on machine learning, scientific computing, or data processing tasks.
Keep exploring and experimenting with CUDA and Docker to unlock the full potential of your NVIDIA GPU. Happy coding!

